If there’s one maintenance item that quietly decides how smooth, safe, and expensive your motorcycle ownership experience will be, it’s the chain. Most riders obsess over tires, exhausts, or oil brands, but neglecting the drive chain is one of the fastest ways to ruin performance and shorten the life of both sprockets and engine output efficiency.
I’ve spent years riding everything from daily commuters to high-torque sport bikes and ADV machines, and I can tell you this with confidence: a properly maintained chain can feel like a completely different motorcycle compared to a neglected one. It affects throttle response, shifting smoothness, fuel efficiency, and even long-distance comfort.
This isn’t a generic maintenance checklist. This is how experienced riders actually think about chain care in real-world conditions—city riding, highway cruising, rain, dust, and everything in between.
The first thing most riders misunderstand is what a motorcycle chain actually needs. It’s not just “lubrication.” A chain operates under constant tension, rotation, heat, and exposure to debris. Every time you twist the throttle, the chain is transmitting engine torque directly to the rear wheel. That means it is constantly under mechanical stress and surface friction.
A chain is made of multiple moving parts: inner and outer plates, pins, bushings, and rollers. The lubrication that matters most is not what you see on the outside, but what is inside those tiny pivot points. Once that internal lubrication breaks down, wear accelerates rapidly—even if the chain looks fine externally.
Let’s start with chain slack, because this is where most riders get it wrong.
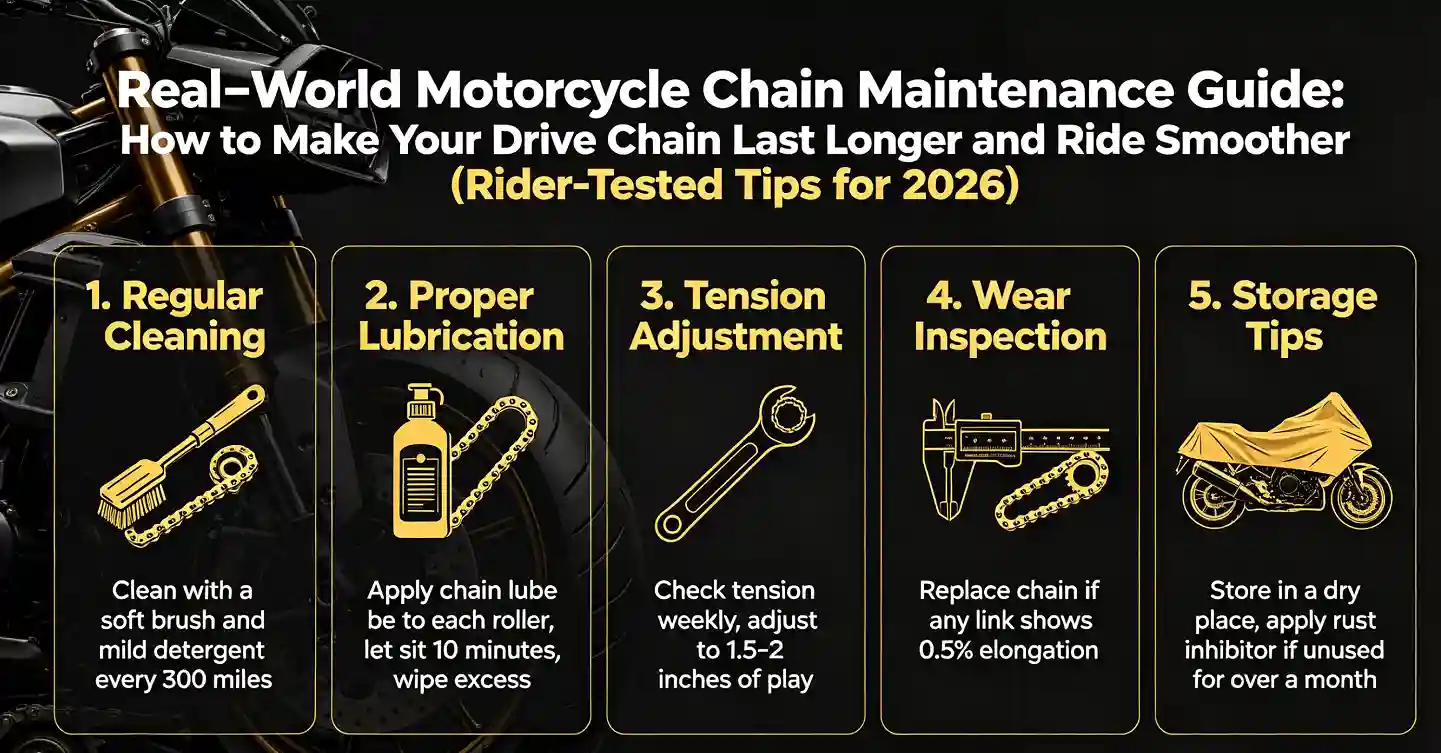
Every motorcycle has a manufacturer-specified chain slack range, usually measured in millimeters of vertical movement at the midpoint between sprockets. Too tight, and you put stress on the countershaft, output bearing, and suspension movement. Too loose, and you risk chain slap, poor throttle response, and even chain derailment.
A common mistake is adjusting chain tension while the bike is on a stand without considering suspension load. The real measurement should account for how the swingarm geometry changes under rider weight. That’s why many experienced riders check slack with someone sitting on the bike or simulate load by compressing the rear suspension slightly.
A too-tight chain often feels “responsive” at first, but it silently destroys components over time. I’ve seen output shaft seals start leaking simply because riders over-tightened their chains thinking it improved performance.
Next comes cleaning, and this is where most people either overdo it or underdo it.
The chain accumulates a mix of road grime, dust, old lubricant, and sometimes sand or salt if you ride near the coast or in winter conditions. This mixture becomes abrasive paste that wears down O-rings and metal surfaces.
The correct approach is simple but often misunderstood. You don’t need aggressive solvents or high-pressure washers. In fact, high-pressure water can force contaminants past seals and shorten chain life.
A soft brush, a proper chain cleaner, and patience are enough. The key is consistency. Light cleaning every few hundred miles is far more effective than deep-cleaning once in a while after the chain has already deteriorated.
One practical tip: always clean the chain after riding in rain. Moisture accelerates corrosion, especially if your bike is parked outdoors. Even a quick wipe-down makes a noticeable difference over time.
Now let’s talk about lubrication, which is where riders tend to develop strong opinions.
Chain lube has two primary purposes: reducing friction between moving parts and protecting against corrosion. But not all lubricants behave the same way.
Wax-based lubes tend to attract less dirt, making them ideal for dry conditions and street riding. Wet lubes last longer in rain but can collect more debris. The “best” option depends entirely on your riding environment.
The biggest mistake I see is over-lubricating. More lube does not mean better protection. Excess lubricant gets flung off onto the rear wheel and tire, creating a mess and potentially reducing traction if it builds up.
The correct technique is applying a thin, even layer on the inner side of the chain while slowly rotating the wheel. After application, let it sit for at least 20–30 minutes before riding so the solvent carrier evaporates and the lubricant adheres properly.
One often ignored factor is chain wear detection.
A worn chain doesn’t always look obviously damaged. Instead, it gradually elongates due to pin and bushing wear. This is called “chain stretch,” although technically the metal isn’t stretching—it’s wearing internally.
You can check this by measuring chain slack at multiple points while rotating the wheel. If slack varies significantly, that’s a sign of uneven wear. Another method is pulling the chain away from the rear sprocket at the back. If you can expose a large portion of the sprocket teeth, your chain and sprockets are likely nearing replacement.
A worn chain rarely fails suddenly—it gradually reduces performance first. You’ll notice rough shifting, inconsistent throttle response, and vibration at higher speeds before anything catastrophic happens.
Sprockets are equally important, and they wear together with the chain. A common rookie mistake is replacing only the chain and keeping old sprockets. That’s like putting new tires on a bent wheel.
Worn sprockets develop hooked teeth, which accelerate new chain wear. If you run a new chain on old sprockets, you shorten the lifespan of both significantly.
Experienced riders always replace chain and sprockets as a set. It’s not just maintenance—it’s protecting the entire drivetrain.
Environmental conditions play a huge role in chain life.
In dry, dusty environments, abrasive particles act like sandpaper. In wet or coastal areas, corrosion becomes the primary enemy. In urban stop-and-go riding, heat cycles and constant acceleration/deceleration stress the chain differently than highway cruising.
That’s why there is no universal “mileage interval” that applies to everyone. A chain in perfect conditions might last 25,000 miles or more, while the same chain in harsh environments may need replacement at 10,000 miles.
One thing I always emphasize to newer riders is listening to your motorcycle.
A healthy chain is almost silent. You might hear a faint mechanical hum, but nothing distracting. When a chain starts making slapping noises, rhythmic clicking, or vibration under load, it’s communicating a problem.
These sounds are often early warning signs long before visible damage appears.
Finally, let’s talk about a maintenance routine that actually works in real life, not just in manuals:
After every wet ride, quick wipe and light inspection.
Every 300–600 miles, light cleaning and lubrication depending on conditions.
Every 1,000 miles, full inspection of slack and sprocket wear.
Every major service interval, evaluate chain and sprockets as a system.
This isn’t about being obsessive—it’s about preventing small issues from turning into expensive repairs
The truth is, chain maintenance doesn’t require advanced mechanical skill. It requires consistency, attention, and understanding how the system actually works. Once you develop that mindset, you start noticing subtle changes in how your motorcycle feels, not just how it looks.
And that’s where the real riding experience changes. A well-maintained chain doesn’t just extend component life—it makes the entire bike feel sharper, smoother, and more connected to your inputs.
Most riders only realize this after their first full chain and sprocket replacement cycle. After that, they rarely ignore chain care again.
Because once you’ve felt a properly maintained drivetrain, you don’t want to go back.